In This Story:
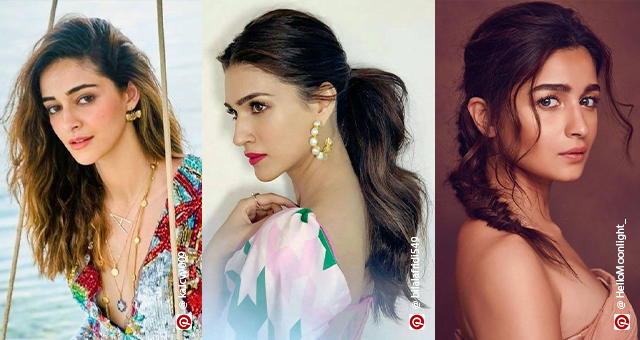
Wavy hair has a texture that’s somewhere between straight and curly, giving it a natural carefree vibe while looking structured. Hairstyles for wavy hair are quite versatile and can suit many different hair lengths as the hair texture is quite forgiving. From soft, romantic looks to bold styles, you can pick from any aesthetic and rock it with your wavy hair. There are beachy waves with an easy-going vibe, defined waves for a polished look, and sleek buns and ponytails for a structured appearance – the possibilities are endless.
Part of the beauty of wavy hair is that it doesn’t always look the same. Each day your waves speak to you in a different way. Some days they will be softer, and some days they will be bouncier. It’s like the sweet spot between plain straight and wild curls. Whether you prefer loose, tousled waves or structured uniform strands, there are several different styles you can opt for to add dimension and enhance the wavy hair texture. It is also the perfect hairstyle to add movement and visual interest to your overall look.
So, it’s a pity if you’ve got wavy tresses but are not doing ‘em complete justice by styling them right. It’s never too late though to unlock the potential of your mane. Now, whether you have been stuck in a major hair rut for a long or simply need to spruce up your look a bit, we’ve got you covered to take you from zero to chic in no time.
Best Wavy Haircuts
If you are ready to take the plunge, here’s a lowdown on the best wavy hair haircuts. Screenshot your pick and consult with your stylist for the ultimate makeover.
1. Shaggy Cut
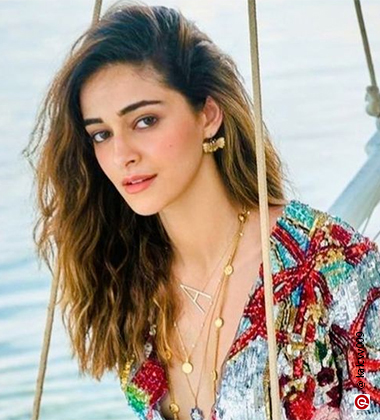
Lots of texture and layers to embrace your hair’s natural texture? Sounds just right to us. The shaggy haircut is the lazy girl’s perfect recipe to look effortlessly cool from A.M. to P.M. You never have to worry about having hair strands out of place because that will only enhance the look further. Think of it as a gorgeous style with a bit of rock-n-roll thrown in. Oh, and you need not bother with heavy-duty styling. Need we say more?
Style With:
2. Wispy Bangs
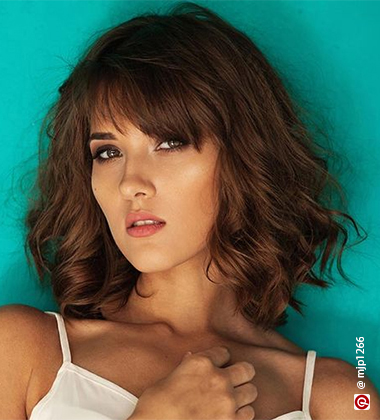
The brow-grazing wispy bangs frame the face and help soften the overall look. These see-through bangs – known to be universally flattering – are perfect if you are in the mood for something playful but don’t want to commit to anything intense (RE: full bangs) yet. It’s especially great for women with long faces. Blow dry the wispy bangs so they look stunning all day.
Style With:
3. Minimalistic Cut
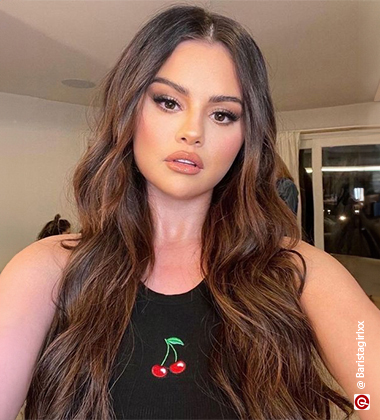
If constantly reminding the hairstylist to maintain the hair length as she goes snip-snip sounds like you, you are in for a treat. We get it, your hair probably made you wait for a lifetime before growing an inch which is why you wouldn’t so easily let go. The minimalistic haircut has long face-framing layers which work along with thick and lush hair. Wash, part your hair off-centre, scrunch, shake, and you are good to go!
Style With:
4. Choppy Cut
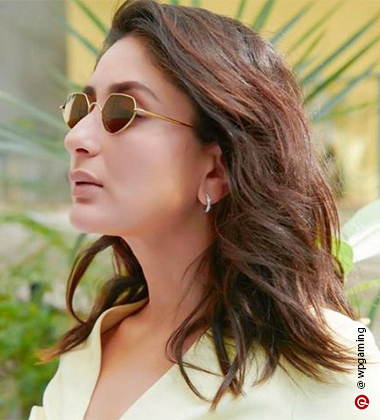
If you’re a sucker for showing off your natural waves but still waiting to score on the volume game, your wait is over. Choppy cut with blunt ends on layers all along the length of your hair adds movement, definition and volume – basically everything that we look for in the hair of our dreams! Fun and slightly edgy, this one’s not for the faint-hearted. If you’re feeling even bolder, cut the layers at imperfect angles.
Style With:
Best Hairstyles For Wavy Hair
These best hairstyles for people with wavy hair will definitely give off-duty model vibes. Excited?
1. Rope Braid Sleek Ponytail
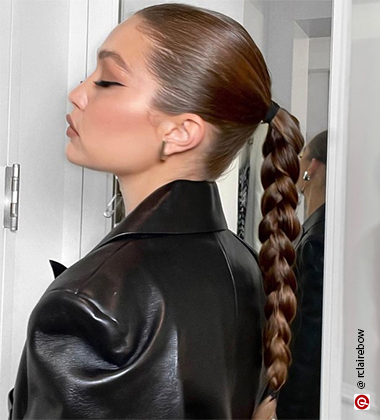
- Step 1: Run a pea-sized amount of Streax Professional Vitariche Gloss Hair Serum to liven up dull tresses. Gather all your hair back into a high ponytail and secure it with an elastic.
- Step 2: Pick a thin section of your hair and wrap it around the elastic. This will conceal the elastic for a classier look.
- Step 3: Divide your pony into two parts and twist each section to the right.
- Step 4: Cross the right part over the left part and keep doing this until you’ve almost reached the end of your hair.
- Step 5: Secure the braid with an elastic. To smooth any flyaways, blast with an intense hairspray such as Bblunt Hotshot Finish Spray.
2. Side Swept Style

- Step 1: Create a deep side parting with the Majestique Tail Comb for Hair Styling. Swoop all your hair over the shoulder on one side.
- Step 2: Scrunch your hair to add definition and shape with the help of Curl Up Curl Defining Cream.
- Step 3: At the back of your head, slide pins heading upward to hold it in place.
- Step 4: Grab a section of hair from the hairline and cross over to conceal the line of pins.
- Step 5: To tame any wispy strays and keep the style in place, spritz some hair spray.
3. Loose Ponytail
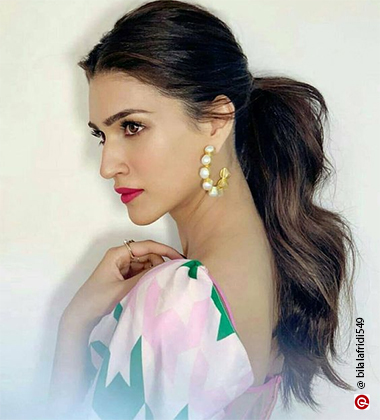
- Step 1: Run a dollop of L'oreal Professionnel Serie Expert Liss Unlimited Primrose Oil on your palms and run your fingers through your tresses to evenly distribute it.
- Step 2: Gather your hair into a ponytail at the back of your head.
- Step 3: Secure the ponytail with an elastic. Take a section of hair and wrap it around the elastic for a smarter look.
- Step 4: Pull out a few stray strands above the ears from either side for a relaxed look.
- Step 5: Mist your hair with the BBLUNT Hot Shot Heat Protection Hair Mist for a sleek finish.
4. French Braid
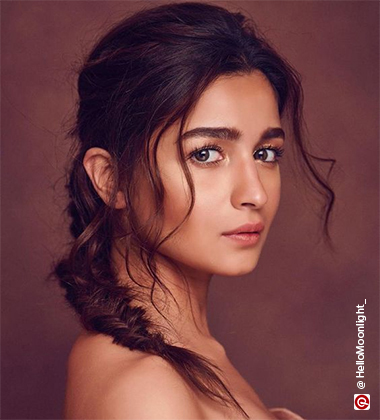
- Step 1: Finger-comb your hair. Don’t bother to fish out the brush since imperfection can help you nail this look.
- Step 2: Part the hair at your hairline into three sections with a styling comb such as the Vega Professional Tail Comb.
- Step 3: Alternately cross the left and right sections over the middle one to form a firm stitch.
- Step 4: For a woven look, with each new stitch, add a little more hair from either side into your braid. When you reach the end of the length, secure your braid with an elastic.
- Step 5: Set the style with a blast of Schwarzkopf Taft Power Hairspray. Transform it into a romantic hairdo by pulling out a few fringes on the front.
5. Messy High Ponytail
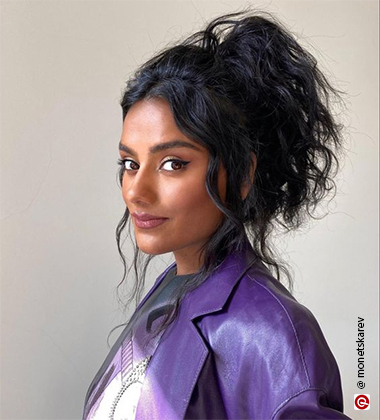
- Step 1: Begin with dry hair and use a texturising spray or dry shampoo for volume.
- Step 2: Lightly backbomb the hair at the crown for a fuller, messier look like Simone Ashley.
- Step 3: Use for hands to gather your hair in a high ponytail. Don’t use a comb as it will give a structured look, we want it messy and natural.
- Step 4: Use a hair tie to secure the ponytail and gently tug at the section around the crown for volume.
- Step 5: Pull out a few hair strands to frame the face. Lightly tease the ponytail for that relaxed, messy vibe.
6. Bun With Side Braids
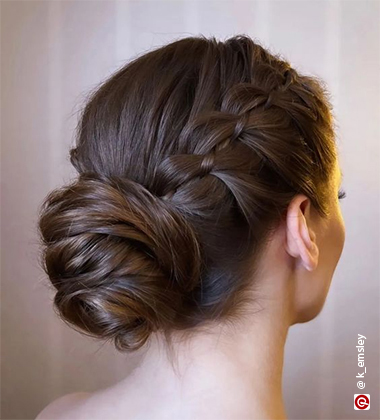
- Step 1: The front of this hairstyle is completely up to you – create a middle split and create braids on either side or choose a side split and create braids on the side with the smaller section.
- Step 2: Create fish braids and bring them toward the back, tying the ends with skinny hair ties.
- Step 3: Gather the rest of your hair in a bun and secure it with bobby pins or a hair tie.
- Step 4: Take each braid and wrap it around the base of the bun, tuck them in, and secure them with bobby pins.
- Step 5: Gently pull at the braids to create a relaxed look.
7. Curtain Bangs
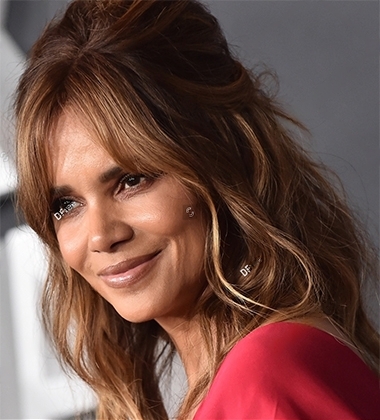
- Step 1: Part your hair down the middle and section off a portion of hair to create the curtain bangs.
- Step 2: Use a round brush to shape your bangs by brushing them away from your face. You can also blow-dry the hair to help maintain its shape.
- Step 3: To add definition to the bangs, use a curling iron with a thin barrel to shape the ends away from your face.
- Step 4: Lightly brush the rest of your hair and secure it at the back with a stylish claw clip or bobby pins.
- Step 5: Finish with a light-hold hairspray to keep your bangs in place.
8. Wet Hair Waves
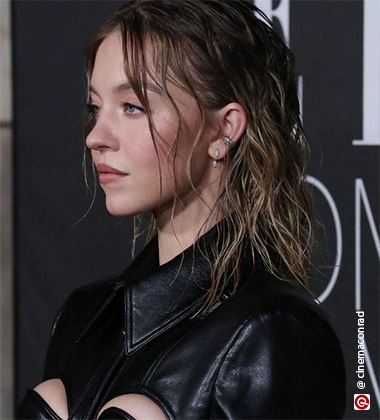
- Step 1: The trendy wet-hair look is all about achieving a sultry ‘just out of the shower’ appearance. Begin with damp hair or spritz dry hair with water and apply a frizz-reducing serum.
- Step 2: Next, you will need to use a styling mousse or hair gel to define your waves.
- Step 3: Start styling the hair and set it in place. Coil small sections around your fingers to enhance the wavy texture.
- Step 4: Once your is styled, allow it to air-dry completely. This can take a few good minutes so patience is key.
- Step 5: Finish the look with a hair shine spray to lock the hairstyle in place and achieve that glossy look.
9. Pixie Glam
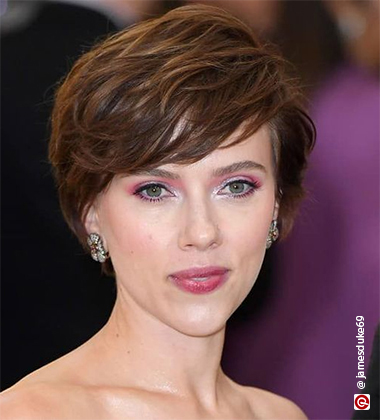
- Step 1: Pixie haircuts are super easy to style. You need to begin with slightly damp hair. If your hair is dry, moisten it by spraying water.
- Step 2: Begin by parting the front pieces depending on the side you prefer.
- Step 3: Use a root concealer for a fuller look and added volume as pixie haircuts expose the scalp.
- Step 4: Now for the glam part. Apply a frizz-reducing serum for that flawless shiny look. Also, take this opportunity to define the wavy hair texture.
- Step 5: Use a hair cream for definition and run your fingers through one last time for a tousled look.
10. Baby Bangs
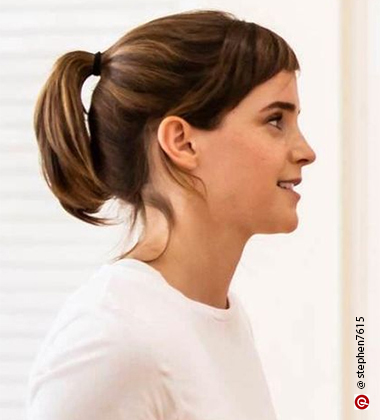
- Step 1: If you wish to elongate the face and bring focus to your eyes, baby bangs with a ponytail are the perfect everyday hairstyle for wavy hair. If you don’t wish to commit to permanent bangs, opt for clip-on bangs.
- Step 2: Set your bangs (actual or clip-on) in place with a round brush to set it on place.
- Step 3: Create a ponytail at the back and secure it with a hair tie.
- Step 4: Further use the brush to shape and perfect the ponytail for a polished look.
- Step 5: Tuck in the end parts of the bang behind your ears or use them to frame the face.
11. Half Up, Half Down
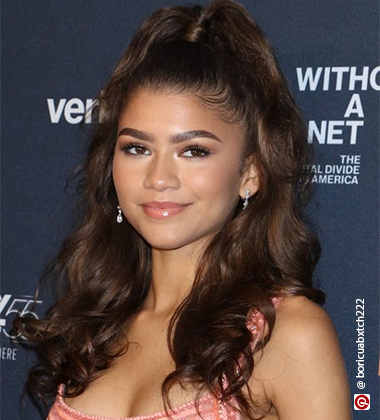
- Step 1: If you love letting your hair down but don’t want it too close to the face, this half-up, half-down style is for you. Begin with drying your hair completely.
- Step 2: Use a hair serum to add shine, density, and volume to the hair.
- Step 3: Create a high ponytail with just the top section of your hair and secure it with a hair tie. Take a small section of hair from the pony, wrap it around the base, and secure it with a bobby pin at the back for a seamless look. Alternatively, you can also go for a man-bun or two space buns on the top.
- Step 4: Brush the rest of the hair and bring them over on either side of your shoulders.
- Step 5: Use a hair gel, cream, or wax for a sleek finish on the crown.
12. Side Part With Braids
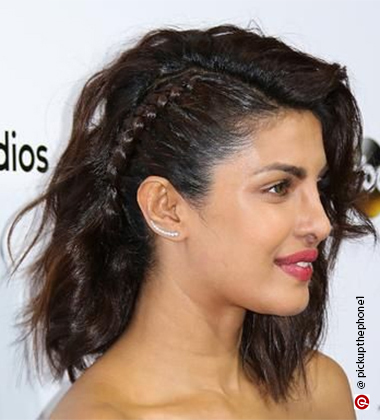
- Step 1: This side part with braids is perfect if you want a bold look that still looks elegant. You will need to create this hairstyle on slightly damp hair.
- Step 2: Part the hair to create two sections – you need to be just slightly off-centre and not completely on either side.
- Step 3: Apply a strong hold mousse to the shorter side and begin by taking three small sections closest to the forehead.
- Step 4: Braid the hair and add smaller sections of hair strands with every twist like you would with a fish braid. Secure the end of the braid with a hair tie and blend it into the hair with a bobby pin.
- Step 5: Apply the mousse to the rest of the hair for a similar shiny look and hold the waves in place.
13. Elegant Bow
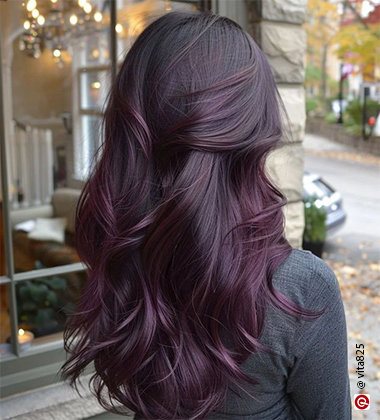
- Step 1: This cute hairstyle starts with parting two front pieces and tying the rest of the hair back.
- Step 2: Use a blow dryer brush to ensure they are facing inward to frame your face perfectly.
- Step 3: Now let down the rest of your hair and take two sections from either the front side and secure it at the back with hair ties or bobby pins.
- Step 4: Use the blow dryer brush again to style the waves.
- Step 5: Add a bow clip or hair ribbon for an elegant look.
14. Accessorised Bob
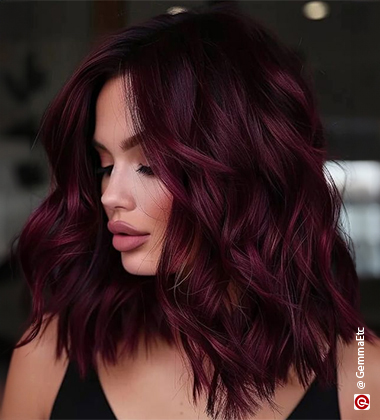
- Step 1: Adding statement accessories to a wavy bob is perfect for special occasions. Begin by using a hair serum that adds shine for a glamorous look.
- Step 2: Part your hair to create a side partition, depending on where you want to add your accessory.
- Step 3: Set your hair in place with a light-hold hair spray for a frizz-free glossy finish.
- Step 4: Add your statement accessory in the desired position.
- Step 5: Secure the accessory with bobby pins. This is very important as the clasps attached to these accessories may not hold all your hair and might slip off after wearing them for a while.
15. Classic Old-Money Bob
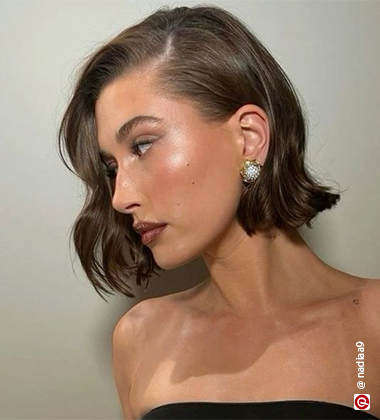
- Step 1: This don’t-mess-with-me angled bob is the perfect choice for everyday formal looks. Begin with using a hair serum to add a subtle shine that will provide a healthy appearance, especially if you have dull hair.
- Step 2: Use a tail comb to get that perfect side part for that defined angled bob.
- Step 3: Tuck in the shorter side behind your ears with a few strands falling out.
- Step 4: Comb the hair in the larger section to ensure it’s perfectly framing your face.
- Step 5: Fix any flyaways with a hair-setting stick for a polished look.
16. Y2K Vibes
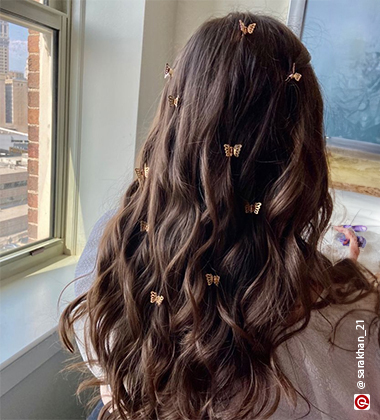
- Step 1: Start with damp hair and apply mousse to enhance the texture and add volume.
- Step 2: Section off your front pieces or create a parting (side or middle) and let your hair down.
- Step 3: Use your fingers to get seamless loose waves. You can create waves going in opposite directions for a tousled look.
- Step 4: Allow your hair to air dry and set in place. Use a light hair spray if your hair tends to be frizzy.
- Step 5: Now for the fun part! Strategically place Y2K-inspired butterfly clips sparsely to get a look fit for fairy princesses.
Key Takeaway
Wavy hair texture has a carefree, easy-going vibe and can be styled in many versatile ways depending on the occasion and your preferences. You can pick between beachy waves for a relaxed look, accessorised hairstyles for special occasions, or sleek buns and ponytails for formal events. Wavy hair naturally comes in a variety of textures, including softer waves or more defined textures that almost look like soft curls. So, you can pick haircuts and hairstyles for wavy hair depending on your hair type as well as its length. At the end of it all, it’s all about embracing your natural hair and experimenting with different styles that make you look and feel good.
FAQs
-
Suggest haircuts for long wavy hair.
When choosing haircuts for long wavy hair, the definite head turners include disconnected wavy lobs, layered cuts with random waves, side-swept bangs with layers, and feather cuts.
-
Suggest short haircuts for wavy hair.
When choosing short haircuts for wavy hair, opt for one of these: tousled wavy bob, curly pixie, wavy inverted bob, or side parted concave bob.
-
How to make wavy hair dry without frizz?
- Moisturise your hair with a conditioning hair mask to lock in moisture. You can skip shampoo alternately and focus on conditioning to keep your wavy hair from drying out. Nykaa Recommends: Wella Professionals INVIGO Nutri Enrich Deep Nourishing Mask
- Avoid giving your hair the final rinse with hot or warm water. Ensure the water is not ice-cold but colder than room temperature. It will help seal the follicles and it won’t make your hair appear frizzier.
- If you want the waves in your hair to appear smooth and soft, you can opt for a leave-in conditioner or smoothing serum. This will make it easier to style your hair later and will make it more manageable. Nykaa Recommends: Redken Acidic Bonding Concentrate Leave-In Treatment.
- If you want your waves to look more defined and well-structured you can pin your hair into loose loops all over the head and wait for it to dry. Once it dries, release your hair and the damp hair will have taken up a defined wavy pattern.
- Avoid using regular bath towels as they can cause your hair to dry. Use an old cotton tee or micro-fibre towel and squeeze in the excess water to dry your hair. Remember, friction causes frizz and being gentle will help your hair appear smoother when it dries off completely.
