In This Story:
If you have straight hair and always end up wearing your hair down, we have one guess – you have not quite discovered the potential of your sleek mane. This also goes for women who have straightened their hair to get those straight, disciplined locks and are still sporting the same old hairstyle. Don’t get us wrong, straight hair looks great when let down as it is sleek. Another great advantage of straight hair is that you can easily tame it the way you like without even schlepping to the salon. However, straight hair or straightening your hair can take away some of the volume and dimension.
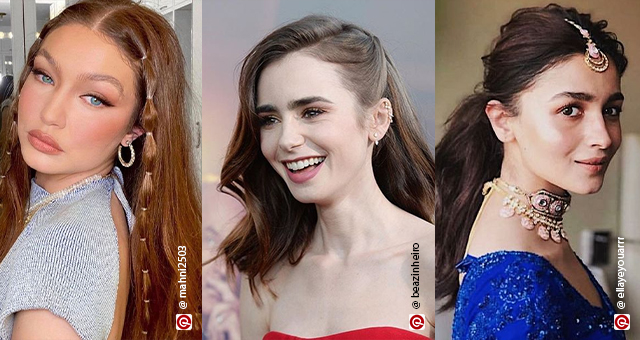
To avoid this flat and boring look, we’ve put together amazing celeb-approved hairstyles for straight hair that can all be recreated in a few simple steps. These hairdos for straight hair will add volume to your hair without taking away from the straight-hair look. We’ve also recommended nourishing serums and products you can use to leave your hair looking healthy and shiny. While some of them require styling tools, you can easily recreate them with just the sleight of hand. So, if you’re ready to live a little and go crazy, try these hairstyle ideas for straight hair.
30 Hairstyles For Straight Hair With Step-By-Step Instructions
Here’s a lowdown on the easy hairstyles for open straight hair that can be a definite game changer in your life.
1. High Rise Plait
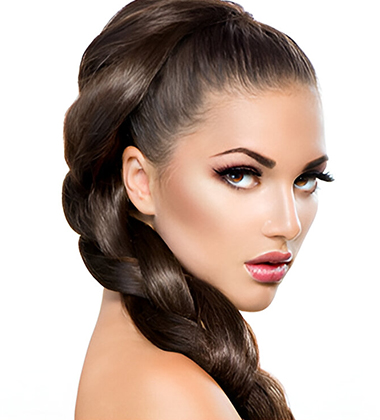
Step 1: Firstly, prep your hair with Streax Professional Vitariche Gloss Hair Serum for added shine..
Step 2: Gather your hair at the crown into a high ponytail and secure it with an elastic.
Step 3: Separate your ponytail into two thick, even sections with the help of the Majestique Tail Comb.
Step 4: Now holding one section, pull and cross it over the other section. Repeat this by now picking the other section.
Step 5: Continue doing this until you reach the end. Secure the braid with an elastic. Tug at the sections for a fuller look.
2. Protruding Pompadour
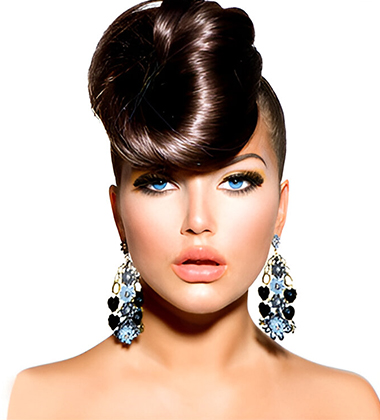
Step 1: Gather your hair at the crown into a high ponytail and secure it with an elastic.
Step 2: Now pull your ponytail to the front before your forehead and twist it along its length, the way you like to form a loose bun. The bun should basically fall over your forehead.
Step 3: Using bobby pins, secure the bun in place. Opt for Bronson Professional Bobby Hair Pins if you want this style to stand the test of time.
Step 4: Lastly, spritz the Sebastian Professional Re-Shaper Strong Hold Hairspray to lock everything in.
3. Braided Pigtails
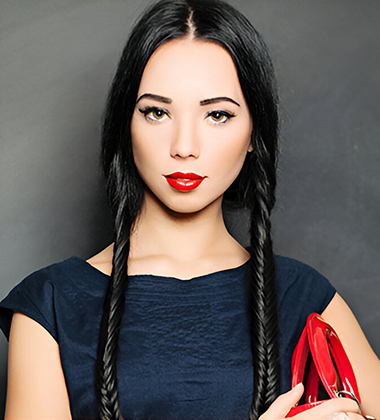
Step 1: Divide your hair into sections and comb through your tresses with Vega Wooden Bristle Paddle Brush to get rid of any visible knots.
Step 2: Now, holding the left section in hand, loosely twist it along its length until you reach mid-length.
Step 3: From here on, start creating a French braid and tie it off at the end.
Step 4: Repeat the above step with the right section.
Step 5: Finish off with the TIGI Bed Head Salty Not Sorry Texturizing Sea Salt Hair Spray. .
4. Cornrows
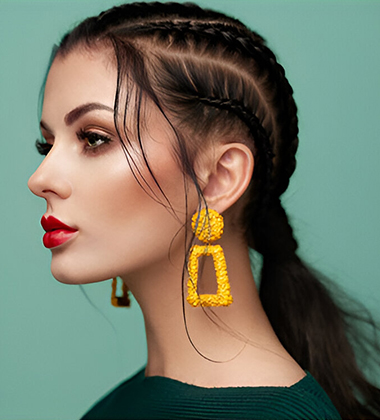
Step 1: To prevent frizz from ruining the end look, first prep your hair with an intense moisturising serum like the BBlunt Intense Moisture Hair Serum.
Step 2: Using Alan Truman CB-03 Metal-Pin-Tail Carbon Comb, now create thin sections, as many as you can from side to side. Clip them all.
Step 3: Unclip the first section and starting from the hairline start braiding to create taut stitches. Stop this process when you reach the nape of your neck and secure it with an elastic. Repeat this with every other section.
Step 4: Now, bring together all the sections at the back into a ponytail and secure with a hair tie.
Step 5: Take a section of hair and wrap it around the tie to elevate the look.
5. High Bun
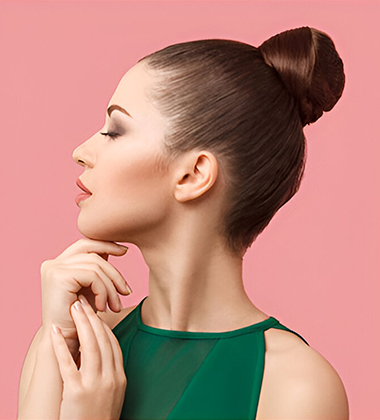
Step 1: Take a dollop of St.Botanica Moroccan Argan Hair Serum and run it along the lengths of your hair
Step 2: Flip your head down and gather your hair on the crown to tie your highest ponytail yet.
Step 3: Holding the ponytail from its end, twist along the length.
Step 4: Next up, using one hand, pancake the root of the ponytail to keep it flat while you wrap your twisted ponytail around it with the other hand.
Step 5: Secure the ends with pins. Finish off with Love Beauty & Planet Argan Oil And Lavender Hair Mist for a killer sleek finish.
6. Space Buns

Step 1: Prep your hair with Livon Shake & Spray Hair Serum.
Step 2: Part your hair in the middle and create two high ponytails. Fasten them with elastics.
Step 3: Twisting the length of one ponytail like a rope, wrap it around the base, mimicking a bun. Secure with an elastic.
Step 4: Repeat with the other ponytail. Tug at the bun to make it appear bigger.
Step 5: Set the double buns using a few quick spritzes of the Bblunt Hotshot Finish Spray.
7. Tied Up Braids
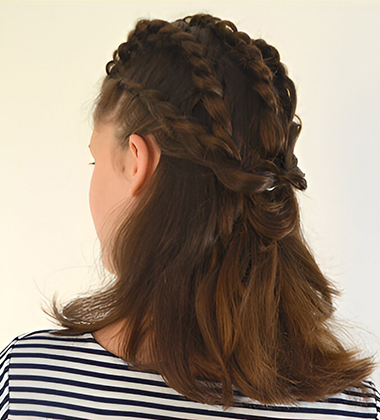
Step 1: Start by creating four sections on the crown from side to side. You can clip the sections with Bronson Professional Crocodile Hair Clips to hold them in place.
Step 2: Unclip a section and start creating a Dutch braid. Stop when you reach the centre of the back of your head and secure it with an elastic.
Step 3: Repeat this with the other sections.
Step 4: Now gather all the braids and knot them at the back. Secure with a hair tie.
Step 5: To hold your artwork in place, finish off with Hair4Real Hair Spray.
8. Side Swooped Ponytail
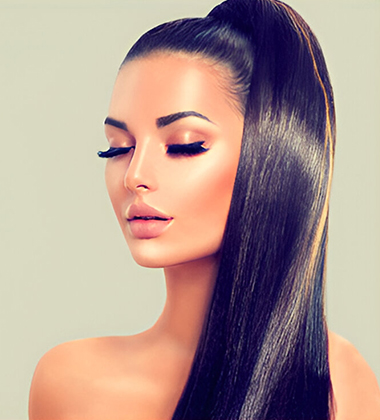
Step 1: Sleek finish is key to nailing this look so start by applying Wella Professional Luminous Oil Reflections Smoothing Oil along the lengths of your hair.
Step 2: Now, straighten your hair in sections with an ironing tool.
Step 3: Gather all your hair at the top of your head and create a high ponytail. Fasten it with a hair tie.
Step 4: Swoop your ponytail to one side so as to fall over your shoulder.
Step 5: Ensure this style survives the day with the L'Oreal Professionnel Xtenso Care Serum.
9. Bubble Braids
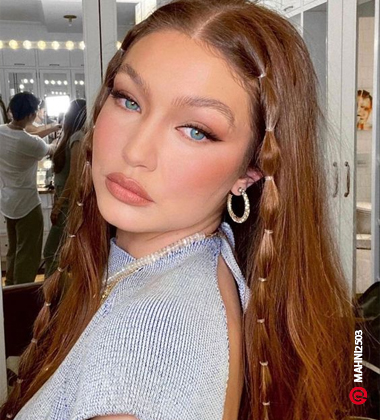
Step 1: Part your hair into two sections on each side of the face and temporarily tie back the rest of your hair.
Step 2: For each section, roughly count 1-inch gaps to calculate the amount of rubber bands you will need.
Step 3: Beginning at the top of one side, tie a rubber band one inch away from your scalp and push it up to create the bubble.
Step 4: Keep adding rubber bands and creating bubbles till you reach the end of the section.
Step 5: Repeat on the other side and open the rest of your hair like Gigi Hadid.
10. Side Part
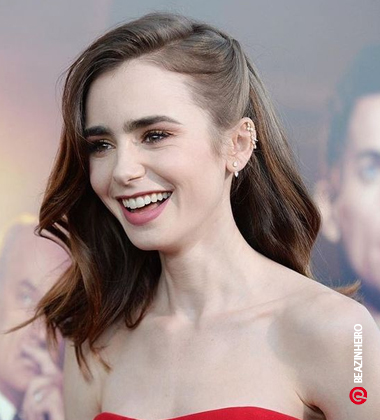
Step 1: Create a side part to highlight either side of your face. While the right side is often preferred, you can pick the profile you prefer.
Step 2: On the shorter side, take a section of your hair and twist it up. Secure it with bobby pins for a seamless look.
Step 3: Apply gel or hairspray to keep the shorter side flat and enhance the side part.
Step 4: Make sure the rest of your hair on the shorter side is swept to the back.
Step 5: Run your fingers through your hair on the larger side and create soft waves for volume.
11. Front Bangs With Bows
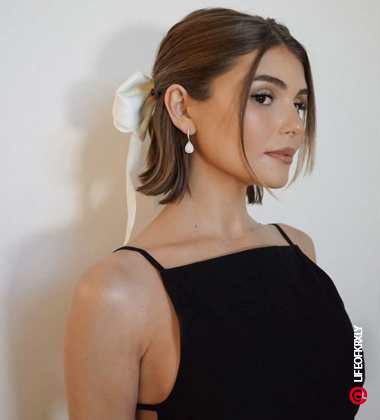
Step 1: Remove two sections at the front to frame the face.
Step 2: Pull the rest of your hair from the crown and secure it in the back with a hair tie to create a half updo.
Step 3: Wear any large bow barette or any bow of your choice.
Step 4: Secure the bow at the back with additional bobby pins if required.
Step 5: Comb the rest of your hair for a clean look.
12. Quick And Easy Scarf
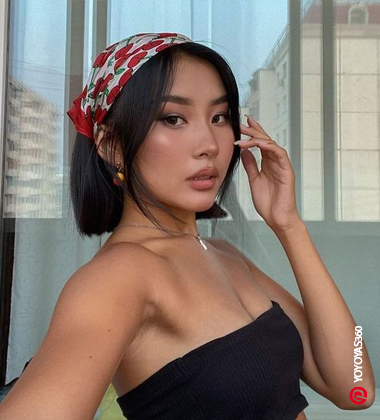
Step 1: Take a section of larger money pieces and pull the rest of the hair to the back.
Step 2: Take your favourite scarf or bandana (printed or solid – your choice) and fold it into a triangle.
Step 3: Lay the flat side of the scarf a few inches behind your forehead to let the front sections peak through.
Step 4: Tie the pointed sections of the scarf under your hair.
Step 5: Secure this with bobby pins at the back.
13. Twisted Crown
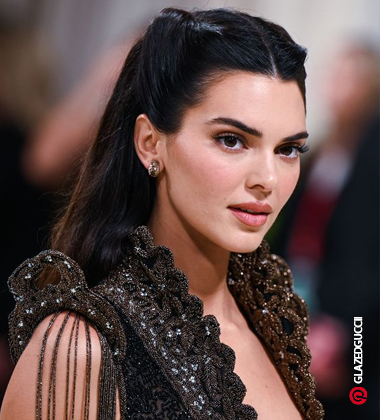
Step 1: Create a middle part using a tail comb and ensure it is a clean break for a sharp look.
Step 2: Brush both sides of the hair to remove all knots.
Step 3: Take a section of hair on either side and begin twisting it toward the centre of the back of your head. Secure the ends with bobby pins.
Step 4: Repeat on the other side and combine the ends of both sections at the back.
Step 5: You can additionally use hair pins or bows to hide the joints.
14. Wispy Ponytail
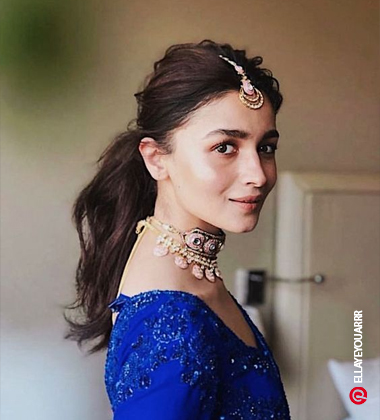
Step 1: Add volume to your straight air with a hair mousse to begin this hairstyle.
Step 2: Create a middle part and add your maang tikka at the centre.
Step 3: Secure the hair accessory with bobby pins.
Step 4: Loosely bunch up the hair at the back with your fingers to get this tousled look and bring it over the bobby pins attached to the accessory.
Step 5: Use hair to create a low ponytail and wrap a section of the hair around the hair tie for a classy look.
15. Voluminous Pouffe
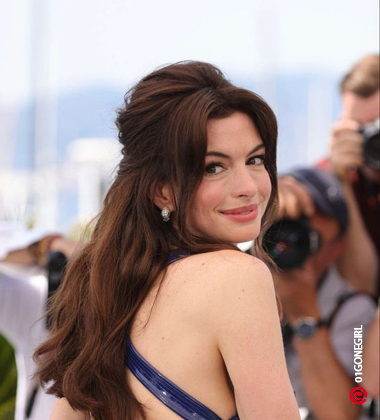
Step 1: Part your hair in the middle and section off two chunks of your hair to frame the hair.
Step 2: A super voluminous look can be achieved with straight hair with a simple trick–backcombing. First, take the section of the hair on the crown and backcomb to create volume.
Step 3: After teasing your hair to achieve the desired volume, secure it in the back with clips.
Step 4: Go in with a stronghold of hairspray to maintain the volume of your pouffe.
Step 5: Comb the lengths of your hair and use a hair mousse to add volume if required.
16. Floral Braids
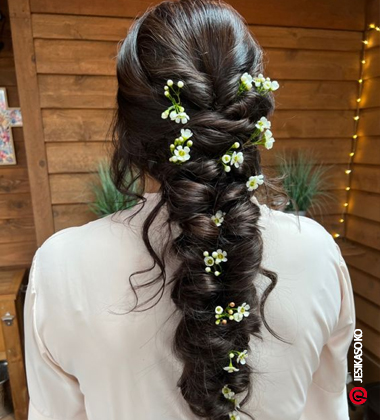
Step 1: Begin with braiding two sections of your hair on either side.
Step 2: Secure the two braids in the centre at the back of your head with bobby pins.
Step 3: Braid the rest of your hair and secure it at the end with a hair tie.
Step 4: Fan out the individual sections of your braid for a voluminous look.
Step 5: Attach fresh flowers or elegant floral pins for a whimsical hairstyle.
17. Crown Braids
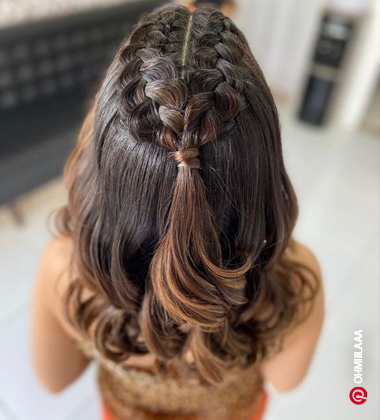
Step 1: Comb your hair to remove all knots.
Step 2: Use a hair serum to get a smooth, shiny finish, and minimise frizz.
Step 3: Begin creating your braids on one side of the hair and flatten individual sections at the crown.
Step 4: Repeat on the other side and combine it with the ends of your first braid.
Step 5: You can secure this with a hair tie or wrap a strand of hair around it for a seamless look.
18. Accessorised Hairdo
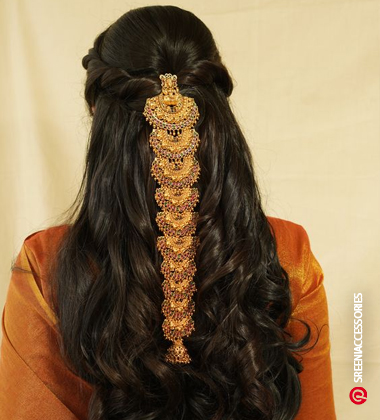
Step 1: Lightly curl your hair at the back to add volume and run your fingers through it to create a natural look.
Step 2: Create twists on both sides of your hair and bring them together at the back.
Step 3: Attach a braid hair accessory at the centre of the two combined sections.
Step 4: Secure the accessory with bobby pins through the length of the hair to keep it in place.
Step 5: Use a hair-finishing stick to tame flyaways.
19. Braided Scarf
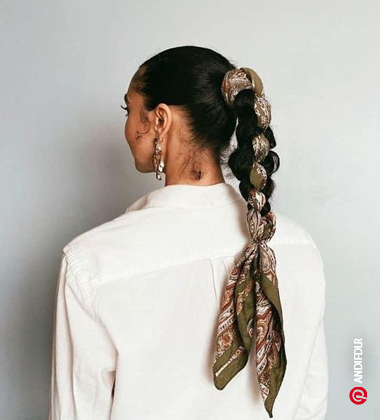
Step 1: Slick back your hair and tie it up in a ponytail.
Step 2: Use hair gel to get a clean look at the front.
Step 3: Wrap a scarf at the base of the ponytail and let the ends be adjacent to your hair.
Step 4: Part your ponytail into two sections and begin creating a three-strand braid with the scarf as the third section.
Step 5: Keep braiding it till you reach the end of the hair and secure your scarf with a hair tie.
20. Mini Buns
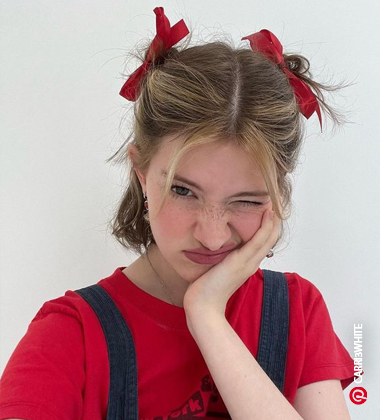
Step 1: Part your hair down the middle and comb it through.
Step 2: Take a small section of hair and create a small bun, securing it with a hair tie.
Step 3: Repeat this on the other side and ensure they are both the same size.
Step 4: Take a small piece of ribbon and tie it around the bun or use a bow clip .
Step 5: You can additionally secure the bows with bobby pins to make sure they don’t go anywhere.
21. The Ballad Of Barretette
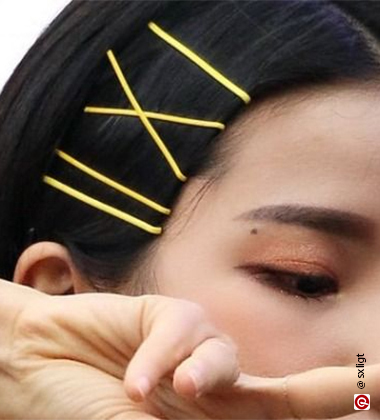
Step 1: Start by parting your hair in the middle.
Step 2: Take a hair-fixing stick to cover all the baby hair and frizz.
Step 3: Take the golden barrettes or hair pins and pin them to your hair, the closer they are to the forehead the cooler.
Step 4: Brush your hair back to let it rest straight.
22. The Lana Coded Hair
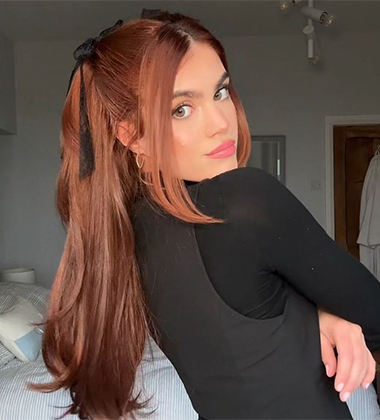
Step 1: Part your hair in the middle with a tail comb.
Step 2: Leave some hair in front to frame your face.
Step 3: Brush your hair with a paddle brush to collect some of your hair from each side.
Step 4: Secure it with rubber bands and add bows to them.
23. The Golden Band
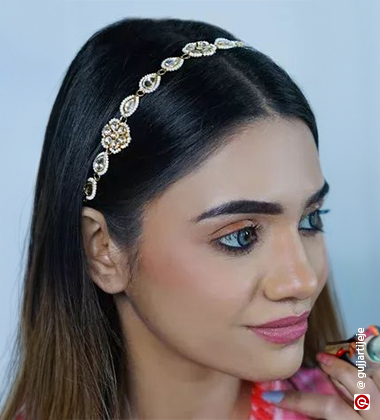
Step 1: Apply some leave-in conditioner that removes all frizz and makes your hair smooth.
Step 2: Part your hair in the middle with a tail comb.
Step 3: Place the golden hairband, one inch away from the forehead.
Step 4: Brush the rest of the hair to set it.
24. Wrapped High Pony
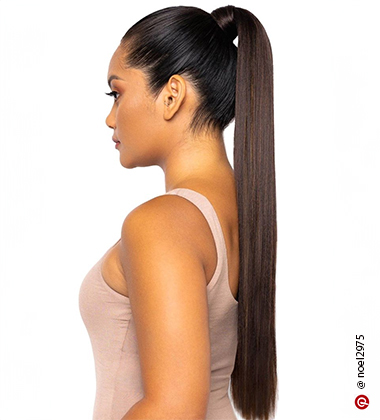
Step 1: Collect all your hair together in the back on top.
Step 2: Secure it with a rubber band.
Step 3: Take a strand of your hair and wrap it around your high ponytail.
Step 4: Use a hair stick to control any flyaways and pesky baby hair.
25. The Mob Wife Claw Hair
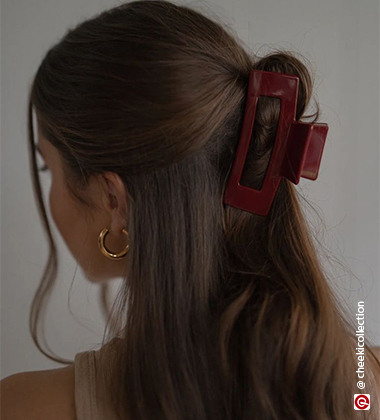
Step 1:Take a paddle brush and comb your hair behind.
Step 2: Leave a few small strands of hair in the front to frame your face.
Step 3: Take a claw clip and secure a small portion of your hair in the back.
Step 4: You can also tie your hair first with a rubber band and then add the claw clip for an extra firm hold.
26. The 90s Side Braids
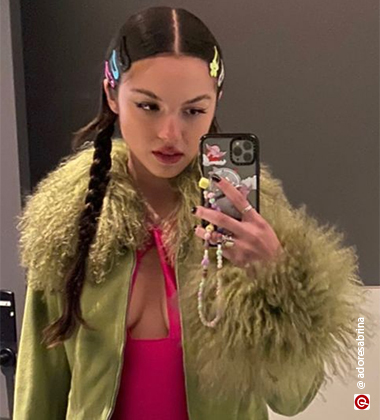
Step 1: Part your hair in the middle with a tail comb .
Step 2: Tie two low ponytails on either side of the head.
Step 3: Take those low ponytails braid them and secure them with rubber bands.
Step 4: Add some hair clips to the frontal area of the head.
27. Slick Back Bun
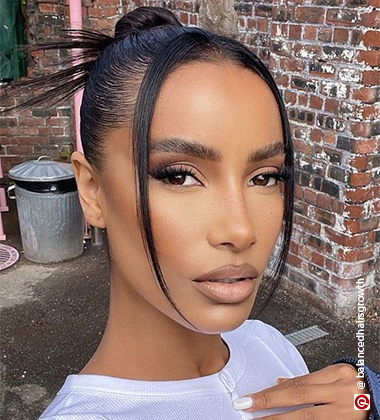
Step 1: Part your hair in the middle.
Step 2: Leave a few strands of hair in the front and brush everything back.
Step 3: Tie your hair in a bun and secure it with a rubber band or hair stick.
Step 4: Use a hair-finishing stick for that slick-back look.
28. The Face Framing Braids
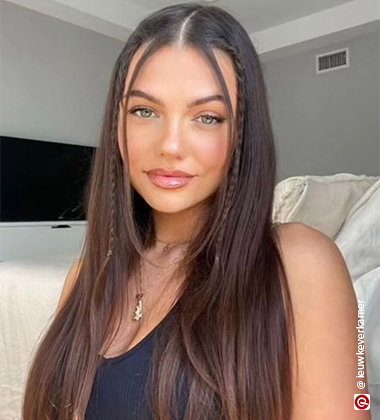
Step 1: Part your hair in the middle.
Step 2: Secure a triangle of hair from the frontal area with rubber bands.
Step 3: Braid those small strands of hair and add invisible elastic bands at the end.
Step 4: Brush the rest of the hair in the back.
29. Retro Beads
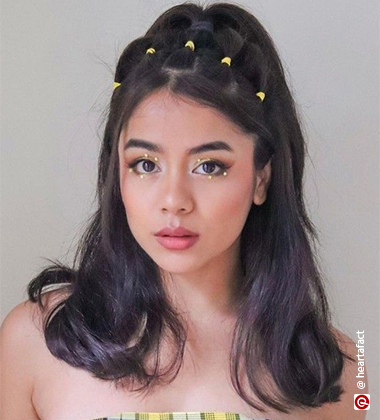
Step 1: Part your hair in five parts, and secure each part with a clip.
Step 2: Add beads to each section and remove the clip holding the hair strands.
Step 3: Collect all the small partitions and combine them into one high-half ponytail.
Step 4: Brush the rest of the hair for a soft, subdued look.
30. Low Pony With Wispy Bangs
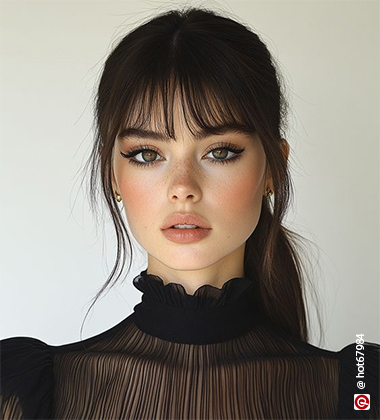
Step 1: If you don’t have fringes of your own, add hair extensions that make up for temporary hair bangs.
Step 2: Brush the rest of the hair in the back and secure it with a hair band for a low pony.
Step 3: Add volumising hair spray to your bangs for a fluffier look.
Step 4: Take a few strands out of your low pony as face-framing tendrils.
Key Takeaways
Straight hair looks great open but can end up looking flat and boring if that’s all you do with your hair. Proper styling and a few accessories can really take straight hair to the next level. All straight hairstyles we recommended above can be easily recreated with any hair length. So, whether you have long hair that is the envy of all or shorter haircuts, you can rock any of these haircuts.
FAQs
-
Can I add volume to straight hair without heat?
Yes! You can use the back-coming or teasing method to add volume to your hair without heat.
-
What is the best way to protect straight hair from heat damage?
The use of heat protectant sprays goes a long way in protecting straight hair from damage.
-
How often should I wash straight hair?
It is generally recommended to wash your hair 2–3 times a week. However, it depends on the thickness and the length of your hair.
-
What style works best for straight hair?
Hairstyles with ponytails and volumising braids work best for straight hair.
-
Do you need to use products for straight hair?
Using serums or oils helps strengthen your hair and improve growth. They are a must for straight, and all other types of hair.
