In This Story:
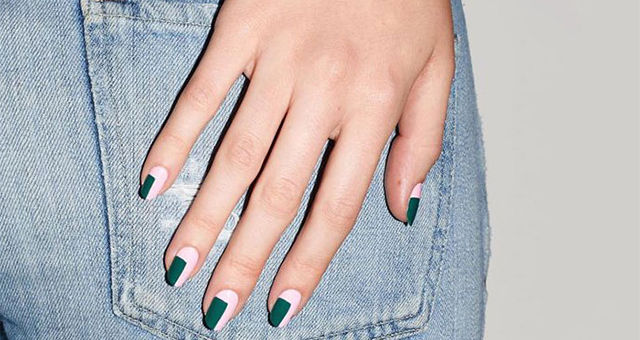
Who doesn’t love a relaxing manicure and nail art appointment at a luxurious salon, right? But the financial consequence of such pick-me-up sessions can drill a hole in our pretty purse. But you’re not alone in thinking this, sister – we are completely with you on the idea of not blowing up money in a fancy nail art studio for something so temporary. Yes, a decent manicure is important in life, but nobody said you can’t DIY it, honey. There are so many easy nail art designs to do at home and we’ve picked just the right ones for all you beginners out there. Presenting simple nail designs that’ll awaken the artist in you. The best part, however, is that you need no nail art tools to perfect these easy nail designs.
Before we get to the designs and how-tos, let us get familiar with what exactly is nail art. Here’s a quick lesson!
The Origin Of Nail Art
Nail art has a rich history dating back to around 3000 B.C. when ancient Egyptians decorated their nails with henna. They adorned both hands and feet with designs like flowers, animals, plants, and other depictions of nature. Over the past 5,000 years, nail art has evolved, but the desire to beautify nails with vibrant colours and designs remains unchanged. This article delves into the journey of nail art from ancient civilisations to today’s innovations like acrylics and gel polish.
Now that you know where nail art comes from, it's time to get inspired and create some of your own expert pieces of nail art!
Simple DIY Nail Art Designs
1. The French Manicure
Tool – Scotch tape
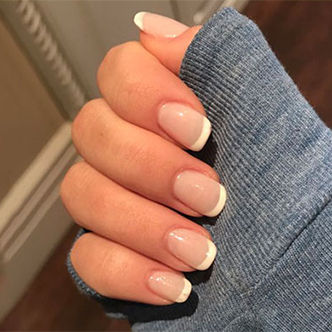
Did you know that this classic manicure is also an incredibly simple nail art design? All you need is some scotch tape and you’re sorted.
Follow these steps to get beautiful and simple nail art
Step 1: Start this easy nail art design with a generous coat of the O.P.I Natural Nail Base Coat.
Step 2: To achieve that crisp line, carefully place a piece of scotch tape so that only the tip of your nail is exposed. Make sure that the width of the exposed area is even. Press the tape down firmly so that it serves as a completely sealed barrier.
Step 3: Now with the tape in place, paint the tips of your nails with the O.P.I Nail Lacquer - Alpine Snow. Don’t worry about perfect strokes, the tape will take care of it.
Step 4: Wait for the white polish to dry completely before peeling the tape off. Don’t be in a rush, you could mess up the white tips.
Step 5: Finally, seal your simple nail art with a protective layer of the O.P.I Top Coat.
2. Designed With Dots
Tools – A bobby pin and a toothpick
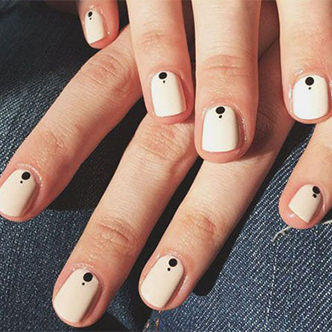
Minimalistic nail art designs are trending right now and the best part of this is the fact that it is such an easy nail art design. Wondering how to do nail art with dotting tools? We’ll show you how.
Follow these steps to get beautiful and simple nail art
Step 1: Start this easy nail art by painting your nails white with the Swiss Beauty Stunning Nail Lacquer - 73 Creamy Dreamy.
Step 2: Now dip the longer end of a bobby pin in Nykaa Nail Enamel - Black Licorice 84 and create a bigger dot at the base of your nail. Using a toothpick, create a smaller dot.
Step 3: Finish off with a top coat like the O.P.I Top Coat.
3. Striped Beauty
Tool – Cut out stripes
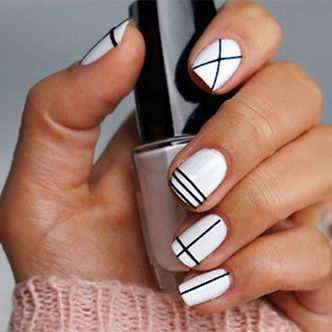
Stripes look super classy but sadly, most women believe that you need a full-blown set of nail art stripes to pull off this nail art at home. Here’s how you do it.
Follow these steps to get beautiful and simple nail art
Step 1: Start by painting your nails white with the Nykaa Matte Nail Lacquer - Almond Crumble 10.
Step 2: Next up, cut out very thin stripes of black metallic tape and stick them on your nails to create a pattern. Clip the extra bit and you’re done.
Step 3: Finish off with a protective top coat like the Renee Cosmetics Top Coat Nail Enamel.
4. Stencilled With Love
Tool – Cut out stencil
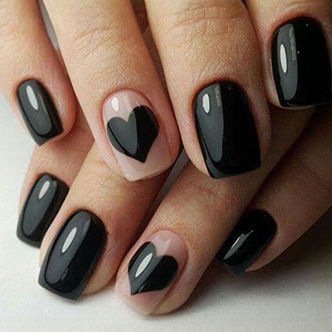
One of the easiest nail art designs to do at home is by adding a cutesy heart as the highlight. And nope, acing that heart isn’t as tough as it looks.
Follow these steps to get beautiful and simple nail art
Step 1: Use a glossy black gel polish for this design. We’d recommend the O.P.I Nail Polish Mini - Black Onyx. Paint all your nails, except the one on your ring finger.
Step 2: Using a regular stencil, draw and cut out a heart on a piece of cardboard paper. The sturdier your makeshift stencil, the crisper the heart. Place this heart-shaped paper on your accent nail and paint within. Remove the stencil to reveal your work of art.
The Right Manicure For The Right Place
What’s a bigger question than ‘how to do nail art’? Which design to select? Most women overlook the glaring fact that not all designs are versatile and go well with your surroundings. For instance, too much glitter in a workplace is an obvious faux pas.
Here’s the ultimate nail lookbook that you need to bookmark before you start with nail art at home.
Best Easy Nail Art Designs For Different Occasions
1. Ideal For Work Wear
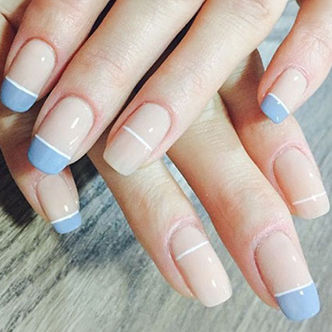
This muted and easy nail art design goes beautifully with your crisp work wardrobe.
Follow these steps to get beautiful and simple nail art
Step 1: Start by painting your nails with Nykaa Salon Shine Gel Nail Lacquer - California Dreams 223.
Step 2: For the blue tips, go with Nykaa Insta Dry Fast Drying Nail Enamel Polish Boho Blue 355 from the same range.
Step 3: Use white nail art stripes to add the finishing touches.
2. Brunching With The Ladies
Tool – Cut out stencil
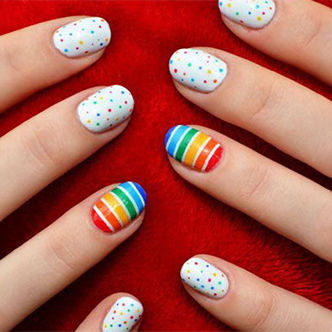
This is such a vibrant nail art design; you can totally impress your girlfriends with this on a fun day outing.
Follow these steps to get beautiful and simple nail art
Step 1: Start by painting your nails (except the accent nail) white with the Swiss Beauty Stunning Nail Lacquer - 23 Glam White.
Step 2: Using different poppy shades from the Lakme 9 To 5 Primer + Gloss Nail Color range and a toothpick, create dots of different sizes.
Step 3: Since your accent nail must resemble a rainbow, create horizontal stripes of the same colours with white nail art stripes between segments.
3. Boozy Nights 101
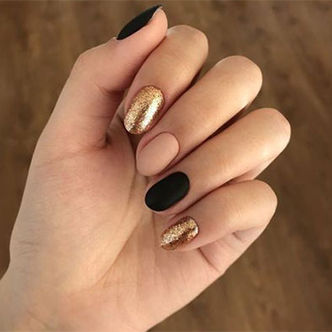
For nights, you want a mani that’s attention-grabbing and does complete justice to your blingy ensemble.
Follow these steps to get beautiful and simple nail art
Step 1: Start this nail art DIY by painting two nails with the Jaquline USA Pro Stroke Gel Nail Polish - Sangria Shot 20. .
Step 2: One nail should be nude, so use the Faces Canada Ultime Pro Splash Luxe Nail Enamel - Keeping Basic L09
Step 3: The rest of the two nails should be totally glitter-studded, so use the Nykaa Star Studded Glitter Coat Nail Enamel - 226 Golden Ticket.
Single & Dual-Colour Nail Art Designs
1. Red Nail Art
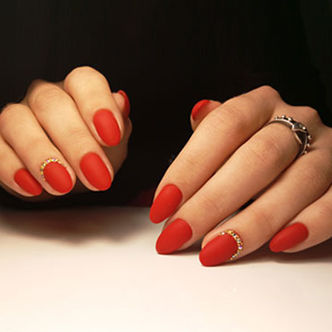
There’s no contesting the fact that red can be drop-dead gorgeous and fiery at the same time. Red nail art can be effortlessly carried from your workplace to an evening date. That explains why it stands as the most popular colour choice to date. To up the oomph factor, opt for tiny crystals.
We Recommend: Revlon Fire n Gold Nail Enamel - Red Sparkle, SUGAR POP Nail Lacquer - 18 Red Rum
2. Blue Nail Art
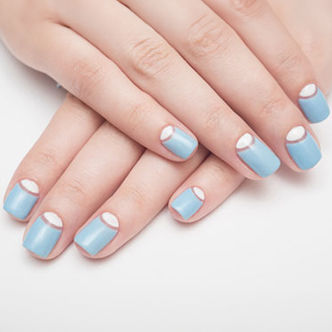
Tools – Scotch tape
The best part about blue especially when treading on the lighter tones is that it’s flattering on most skin tones. To make things interesting you can create a golden arc with a scotch tape and introduce a pop of plain white at the base. Surely, it gives your nail art a peek-a-boo glitzy element out of the blue, no?
We Recommend: Faces Canada Splash Nail Enamel - Frozen 40, Elle 18 Nail Pops Nail Polish - 39
3. Gold Nail Art
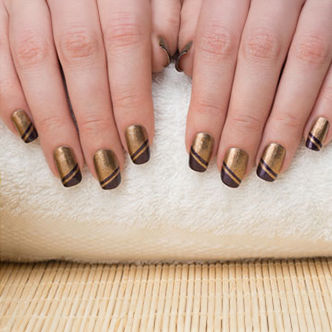
Tools – Tape
It’s time to sparkle. Dip those tips in gold. It’s the easiest way to nail the glamorous goddess look without experimenting with elaborate crystals and glitter flecks. To balance the glitzy factor, you can add inclined stripes of black at the top. To fully pull the look together, top it with a transparent coat. [Au]some.
We Recommend: Colorbar Vegan Nail Lacquer - Shooting Star 205, Lakme Color Crush Nail Art - C4
4. White Nail Art
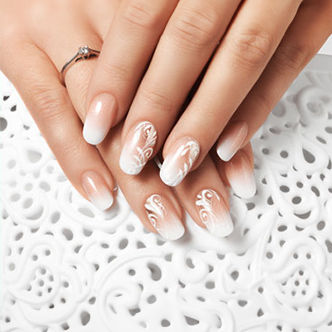
Tools – Floral stencil/decals
Whether you’re attending as a bridesmaid or a bride yourself (congratulations!) or looking to keep your nail art design minimal, opt for this white with negative space nail art. We love this since it’s not all white and overwhelming. Feel free to create artistic patterns on your accent nails and finish with a glossy top coat.
We Recommend: Insight Cosmetics Pastel Color Nail Polish – 68, O.P.I Top Coat
5. Black Nail Art
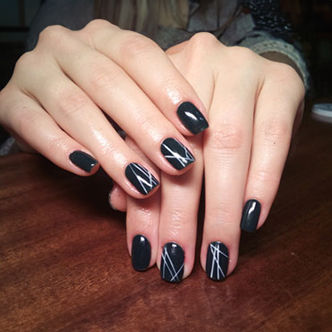
Tools – Line stencil
If your go-to OOTN is an LBD, then this will be just right up your alley. After all, you can never go wrong dressing your nails with black too. It’s inarguably the most classic of all the colours. On a shiny black base coat, draw faint white lines. The addition of white accents gives the plain black an interesting angle.
We Recommend: Swiss Beauty Stunning Nail Lacquer - 24 Midnight, Renee Cosmetics Mattitude Nail Paint - Chalk White
6. Yellow Nail Art
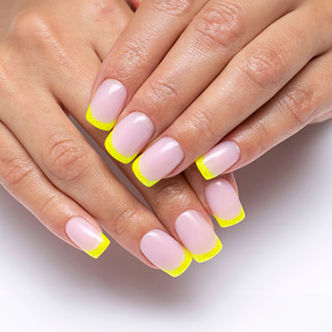
Tools - Tape/French tip guides
The most minimal approach you can take with your nail art is playing up the negative space nail art with an interesting take on your classic French manicure. Swap the safe and trusted white or pink with a bold neon yellow at the tips. When the lightest hue of the colour spectrum runs along the tips, it creates an illusion of longer nails. Clever.
We Recommend: Nykaa Nail Care Double Duty 2-in-1 Top & Base Coat, MyGlamm LIT Nail Enamel - No Chill
7. Green Nail Art
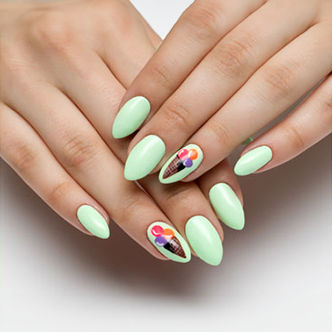
Tools - Ice cream decals
Nah, you don’t need to wait till summer to go crazy about ice creams. Create a cute ice cream miniature on your tips with a paintbrush or decals! Ensure a consistent base coat of cool pista green to usher in the trendy summer vibes at your fingertips. Disclaimer: These ice cream cones are too cute to resist, so don’t mind anyone obsessing over it.
We Recommend: Nykaa Nail Enamel Polish - Hasta La Pista 64
8. Pink Nail Art
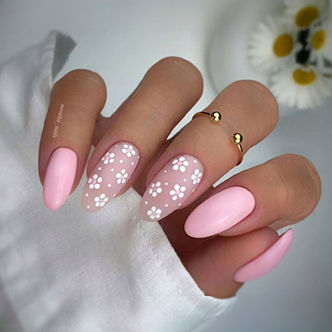
Tools – Floral decals
We could all do with a bit of Barbiecore inspo. Upgrade your regular pink manicured nails with delicate white flowers that are super-easy to replicate! Use a dotting tool to dab miniature flowers on your nail bed on two nails, while the rest of the nails can be painted a flattering pink hue – the perfect nail art for a casual brunch with your girl gang.
We Recommend: SUGAR POP Nail Lacquer - 26 Pink Perfection
9. Purple Nail Art
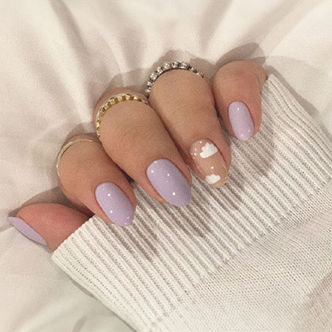
You just can’t go wrong with a soothing pastel hue on your nails. An all-year-long favourite shade, pastel purple would pair perfectly with tiny white clouds. Begin with a transparent base coat on your nail bed and draw a few fluffy white clouds with a nail art brush. Voila!
We Recommend: Kay Beauty Nail Nourish Glitter Pastel Nail Enamel - Gazing Violet, Lakme 9 To 5 Primer + Gloss Nail Color - Marble White
10. Silver Nail Art
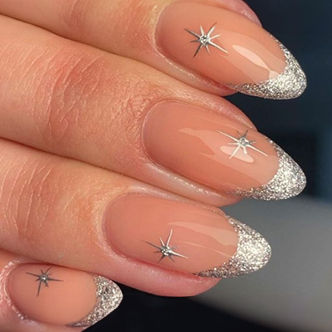
Metallics are a non-negotiable nail art favourite. If a gold hue is not to your liking, consider opting for a silver shade to dazzle on! Let’s try silver French tips, shall we? On the accent nail, you could draw a sparkle – perfect for the festive season. Top it off with a transparent coat to extend the wear of your nail enamel.
We Recommend: DeBelle Metallic Gel Nail Lacquer - Chrome Silver, Nykaa Nail Care - Shine On Top Coat
Wrapping Up
Now that you have these super fun and easy-breezy nail art inspirations, it’s time to pick one and go for it! Remember to order all things nails in advance from Nykaa. And if you are too lazy to pull a DIY successfully, worry not – we have something for you too. Check out our guide on press-on nails that give you a salon-like manicure for less than half the time (and price!). Before we sign off, let’s answer some burning questions about nail art and health below.
FAQs
-
How long does nail art design typically last?
The duration of nail art depends on several factors: the method of application, nail type, aftercare, and the quality of products used to create the nail art design. Simple nail art designs done correctly using the best products can last for at least 4 weeks without any signs of damage. We Recommend: Bronson Professional Nail Art Kit -
Suggest some products to help achieve patterns on nail paint.
-
How do you add glitter to nail art?
- Step 1: Apply your regular base coat on your nails.
- Step 2: Grab a piece of your makeup sponge and dab the glitter of the required shade on it.
- Step 3: Now, using a tweezer, hold the sponge with the glitter side facing down.
- Step 4: Press the sponge on your nail paint to add glitter. S
- eal your nail art with a top glossy coat for protection and shine.
- We Recommend: Lakme Color Crush Nail Art - G9, Nykaa Star Studded Glitter Coat Nail Enamel Polish - Boujee Rose Gold 225
-
What are press-on nails and how long do they last?
- Press-on nails are a less time-consuming alternative to DIY nail art design. These ready-made nail art appear like custom nail art and simply need to be glued onto your existing nails. For better grip, it’s advisable to clip and file your nails as short as possible. Press-on nails can last for a maximum of two weeks with proper care.
- We Recommend: SOEZI I'm A Unicorn Reusable Press On Nails, LiCK Emerald Green Square Shape Acrylic Press On Nails,Kingdom Of Lashes - Press On Nails 48
-
Is it safe to do nail art regularly?
While nail art is safe in general, doing it regularly can adversely impact the health of your nails. According to a study, nail art can lead to nail abnormalities and irregularities on the nail plate. Hence, if you do nail art regularly, ensure that you take care of your nails, too.
-
What material is needed for nail art?
For nail art, you will need some key supplies. These include nail polish in different colours, a base coat and top coat, nail art brushes or dotting tools, nail polish remover, cotton pads or Q-tips, and clear nail polish for sealing your designs.
-
Where do I start with nail art?
To begin creating striking nail art, begin with these fundamental steps that set the stage for your nail art journey:
- Nail Preparation: Begin with clean, well-shaped nails. Trim, file, and buff your nails to ensure a smooth base.
- Base Coat: Apply a base coat to shield your natural nails and create a flawless foundation for nail polish.
- Colour Selection: Pick nail polish colours that enhance your design and fit your chosen theme.
- Nail Tools: Invest in good-quality nail art brushes, dotting tools, and other specialised equipment for creating intricate designs.
- Top Coat: Finish your nail art with a clear top coat to protect and extend the life of your design.
-
How to make your own nail art at home?
Aside from the detailed instructions given in this blog, here’s a simple alternate way to do stylish nails at home:
Grab a nail paintbrush and choose three to six colours that go well together.
Start by applying a clear base coat, then paint alternating stripes of your chosen colours onto your nails.
Finish off with a layer of top coat to seal the design and add shine.
